
Ubuntu 26.04 LTS (Resolute Raccoon) ships on 23 April 2026. Whether you want to try it early, or run it on day one without waiting for the Microsoft Store listing, the usual routes don't work: there's no Store image, and do-release-upgrade from 24.04 won't touch it even after release. Canonical gates LTS-to-LTS upgrade prompts until the first point release (.1), which historically lands around 3 months after GA. That puts 26.04.1 in August 2026, and with it the upgrade path from 24.04.
That doesn't mean you can't run it today. Canonical already publishes daily .wsl rootfs builds on cdimage.ubuntu.com, and WSL has been able to import tarballs and .wsl bundles for years. The catch is that an imported distro skips the first-run provisioning the Store version gives you. No user, no sudo group, no locale. You land in a bare root shell.
This post covers the bleeding-edge path: grab the image, import it, provision it like the Store would, and understand what's changed under the hood so you don't waste an afternoon debugging it. The biggest gotcha is sudo 1.9.16+ breaking every Ansible playbook that uses become. A few smaller deprecations are worth knowing about too.
Why you can't just do-release-upgrade
Ubuntu's release process treats .0 LTS releases as "available, but not the default upgrade target". Even once 26.04 is out, do-release-upgrade on a 24.04 box will tell you:
No new release found.This is working as intended. The Prompt=lts setting in /etc/update-manager/release-upgrades only starts offering a new LTS once the first point release ships, because point releases roll up early bug fixes and hardware enablement stack updates. Jumping onto a .0 on day one is fine for enthusiasts but not something Canonical wants to push to every production fleet via an unattended prompt.
You can force it with do-release-upgrade -d (the development flag), but for WSL specifically there's a cleaner path: import the official rootfs.
Getting the rootfs
Canonical publishes WSL-specific rootfs builds in the ubuntu-wsl subtree of cdimage.ubuntu.com. For 26.04 (codename Resolute Raccoon) the daily-live build lives at:
https://cdimage.ubuntu.com/ubuntu-wsl/daily-live/current/resolute-wsl-amd64.wslThe .wsl extension matters. Recent WSL versions know how to import a .wsl bundle directly via wsl --install --from-file, which is much friendlier than the old wsl --import dance with a .tar.gz and a manual install directory.
You have two ways to get it installed.
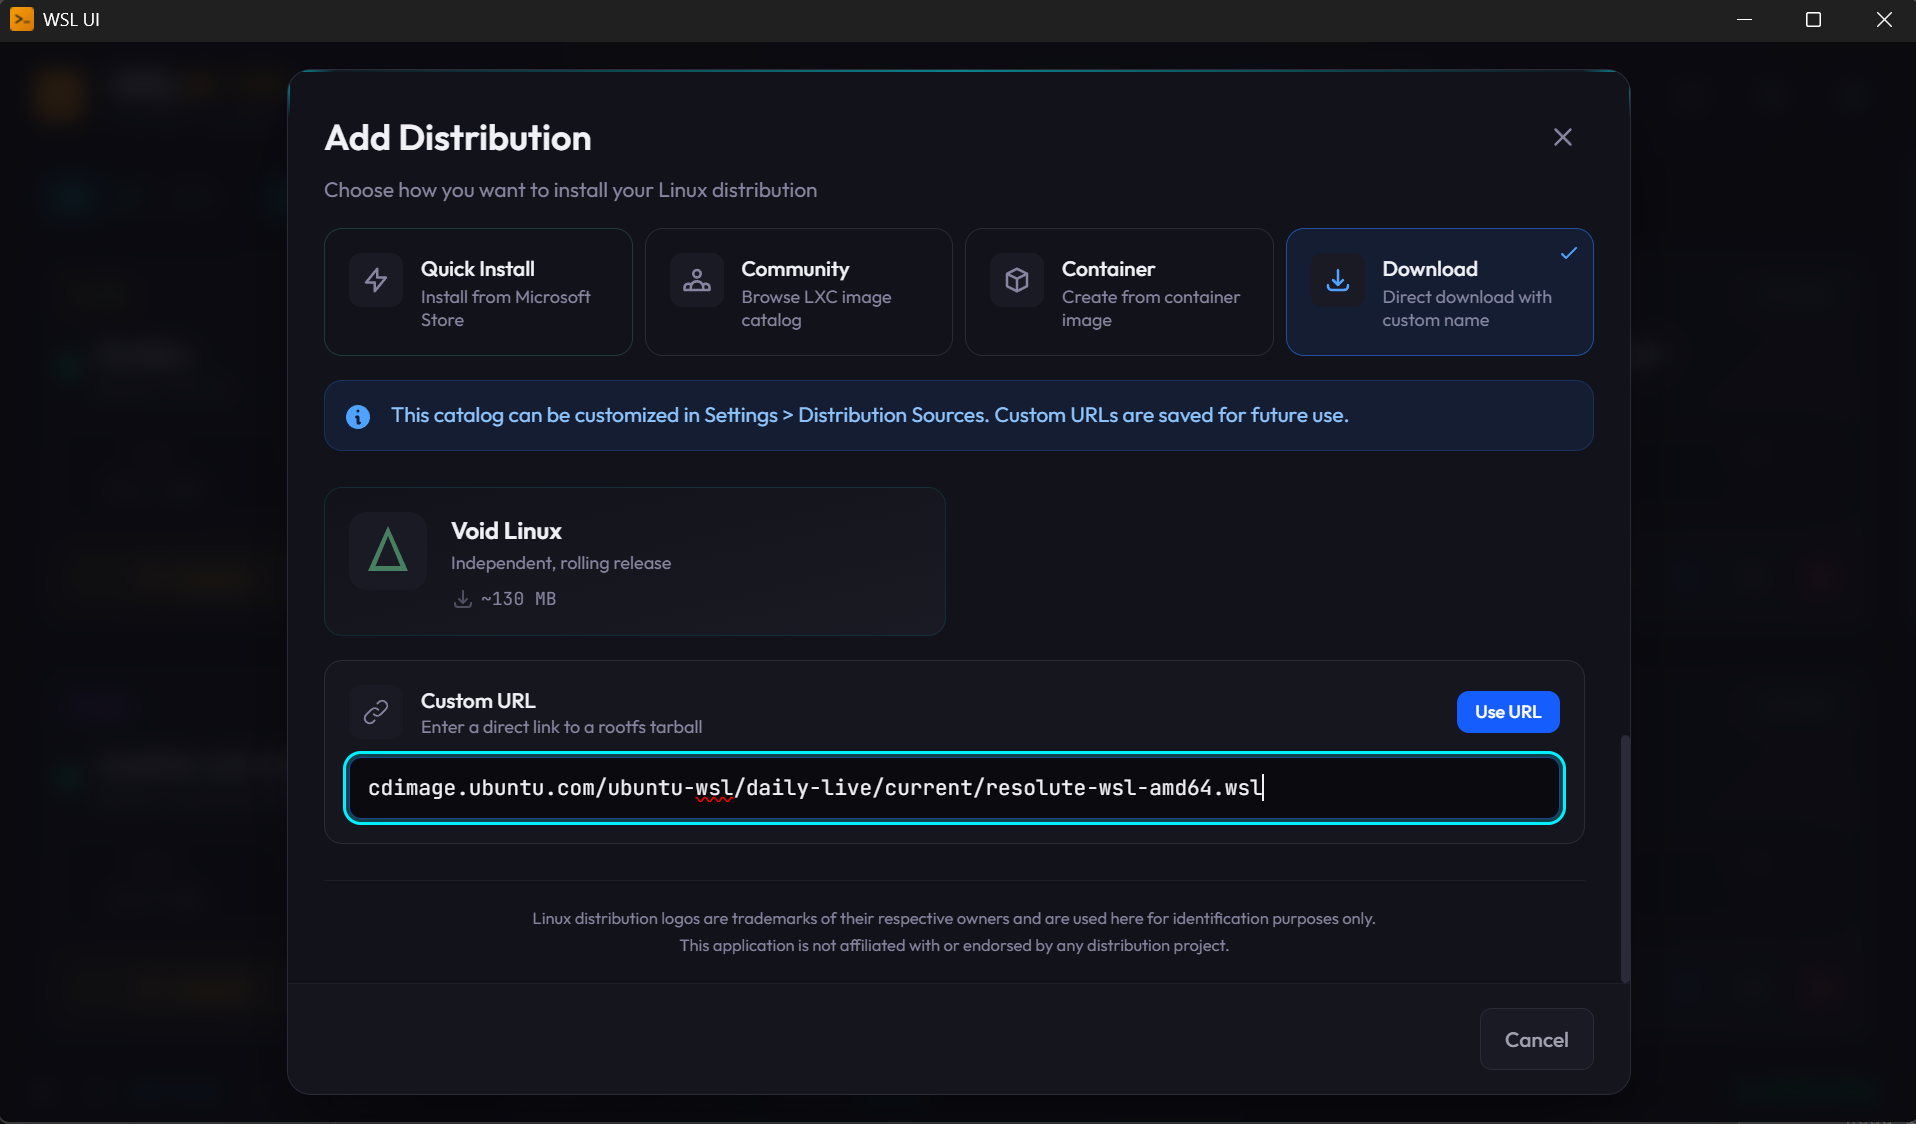
Option A: via WSL UI
If you're already running WSL UI, it supports adding an arbitrary download URL when creating a new distro. Paste the resolute-wsl-amd64.wsl URL into the Download URL field in the "Add new distro" dialog, and WSL UI will handle the download and wsl --install --from-file for you.
Option B: from the command line
If you prefer raw PowerShell:
curl.exe -LO https://cdimage.ubuntu.com/ubuntu-wsl/daily-live/current/resolute-wsl-amd64.wsl
wsl --install --from-file .\resolute-wsl-amd64.wsl --name Ubuntu-26.04
Either route, once it finishes, you'll have a new distro registered. Launch it and you'll land at a root@hostname:~# prompt. That's where the Store experience and the import experience diverge.
Provisioning like the Store would
The Microsoft Store version of Ubuntu runs an OOBE-style first-run script that prompts for a username and password, creates the user, adds them to the sudo group, and sets them as the default user. The imported rootfs skips all of that. Here's how to recreate it by hand.
Run these as root inside the new distro:
# 1. Create your user (prompts for password + gecos)
adduser myuser

# 2. Give them sudo
usermod -aG sudo myuser

# 3. Set sensible defaults WSL would otherwise do for you
cat > /etc/wsl.conf <<'EOF'
[user]
default=myuser

[boot]
systemd=true

[network]
generateResolvConf=true

[interop]
enabled=true
appendWindowsPath=true
EOF

# 4. Locale and timezone (26.04 ships minimal by default)
apt update
apt install -y locales tzdata ca-certificates curl
locale-gen en_GB.UTF-8
update-locale LANG=en_GB.UTF-8
ln -sf /usr/share/zoneinfo/Europe/London /etc/localtime
Then from a PowerShell window on the Windows side, terminate and relaunch:
wsl --terminate Ubuntu-26.04
wsl -d Ubuntu-26.04
You should now come back in as myuser instead of root, with sudo working, systemd running as PID 1, and a proper locale set. Verify:
whoami          # myuser
systemctl status # should NOT say "System has not been booted with systemd"
sudo -v         # prompts for password, then succeeds
If systemd isn't running, you probably forgot the [boot] systemd=true stanza or the wsl --terminate step. WSL only re-reads /etc/wsl.conf on a fresh boot of the distro.
What's actually different under the hood
Getting to a usable prompt is the easy bit. The part that will eat your afternoon is the set of breaking changes in user-space tooling. Three things to know about, in descending order of how badly they'll ruin your day.
1. sudo 1.9.16+ breaks Ansible become (the big one)
If you're provisioning your WSL distro with Ansible (a common pattern for dotfiles repos and homelab setups), this one is a landmine. You'll see:
[ERROR]: Task failed: Timed out waiting for become success or become password prompt.
>>> Standard Error
[sudo: [sudo via ansible, key=...] password:] Password:
Ansible just sits there until the timeout fires, then gives up.
The cause is a change in how sudo renders its password prompt. From 1.9.16 onward (which is what 26.04 ships), sudo wraps whatever prompt you pass it in a [sudo: ...] bracket block containing context info. Ansible's become plugin calls sudo -p with a specific sentinel string, then regex-matches the output stream looking for that sentinel so it can inject the password. With the new wrapping, the sentinel is no longer at the start of the line and the regex misses it.

Things that don't work:
- Setting
become_flags = -H -S -p "Password:"inansible.cfg. Sudo still wraps it. - Running
sudo -vto cache credentials first. The cache doesn't carry into Ansible's per-task subprocesses. - Increasing
timeout. The match never happens, so you're just extending the hang.
The workaround is to grant passwordless sudo for the duration of the playbook run and tear it down afterwards:
# Cache credentials so we can write the sudoers drop-in
if ! sudo -n true 2>/dev/null; then
    echo "Sudo password required for temporary sudoers entry"
    sudo -v
fi

sudoers_tmp="/etc/sudoers.d/provision-tmp-$$"
sudo tee "$sudoers_tmp" > /dev/null <<< "$USER ALL=(ALL) NOPASSWD: ALL"
sudo chmod 0440 "$sudoers_tmp"
trap "sudo rm -f '$sudoers_tmp' 2>/dev/null" EXIT INT TERM

ansible-playbook site.yml  # no --ask-become-pass needed
The trap is what makes this safe: even if the playbook crashes or you Ctrl-C it, the NOPASSWD entry is removed before the shell exits. Don't leave it in place permanently. A permanent NOPASSWD rule has a much bigger blast radius than Ansible hanging for five minutes.
This isn't WSL-specific. Any Ubuntu 26.04 (or any distro on sudo ≥ 1.9.16) will hit it. It just tends to surface first when you're spinning up fresh distros and running your provisioning playbook against them.
2. Ansible community.general.yaml callback is gone
If your ansible.cfg has:
stdout_callback = community.general.yaml…you'll get:
[ERROR]: The 'community.general.yaml' callback plugin has been removed.community.general 12.0.0 (which 26.04 packages) dropped the plugin. The replacement has been in ansible-core since 2.13, so switch to:
stdout_callback = default
result_format = yaml
Same output, built into core, no collection dependency.
3. neofetch is gone; use fastfetch
A small one, but it'll fail your playbooks silently if you have neofetch in a package list. It was removed from the Ubuntu archives after being unmaintained upstream. Replace with fastfetch, which is actively developed, produces the same style of output, and is already in universe.
cgroups, systemd and other WSL-adjacent bits
A few things that aren't new in 26.04 per se, but that bleeding-edge WSL users tend to trip on:
- cgroups v2 only. 26.04 drops the last pieces of hybrid cgroup support. If you have an ancient container runtime config pinned to v1, it's time to let go. For anything modern (Docker 20.10+, Podman, containerd, systemd-nspawn), this is a non-issue.
- systemd as PID 1 in WSL is required, not optional. Plenty of services in 26.04 assume systemd is running (snapd, fwupd, unattended-upgrades, the new
ubuntu-pro-clientbits). If you leaveboot.systemd=falseinwsl.conf, expect half youraptinstalls to print warnings about failed service starts. Turn it on. resolv.confis still managed by WSL, not systemd-resolved. Even with systemd enabled, WSL's built-in DNS plumbing takes precedence unless you explicitly disablegenerateResolvConfand wire upsystemd-resolvedyourself. For most users the default is fine.- Time sync after suspend. Unchanged behaviour, but worth a reminder: WSL's clock can drift after a Windows suspend/resume.
sudo hwclock -sfixes it immediately; if you run long-lived distros, consider a systemd timer.
Is it worth running 26.04 on WSL today?
If you're a developer who wants current toolchains (GCC 15, Python 3.13, systemd 257, a fresher kernel userland) and you're comfortable diagnosing the sudo/Ansible issue above, yes. The distro itself feels stable, and the breakage is all in the provisioning layer.
If you run Ansible-driven dotfiles and don't want to touch your playbooks, wait for 26.04.1 in August, let the do-release-upgrade path open, and let someone else shake out the rest of the upgrade edge cases. 24.04 is supported until 2029, so there's no rush.
For me, the WSL UI "Add new distro via URL" flow plus a 10-minute provisioning script got a clean 26.04 running on a Windows 11 laptop in one sitting. The sudo/Ansible gotcha cost me about two hours the first time and zero the second. That's roughly the ratio you should expect from bleeding-edge work generally.
Useful links: