
Getting WSL-UI onto the Microsoft Store turned into quite the adventure. Tauri doesn't natively support MSIX packaging (the format required for Store submission), so I had to build my own pipeline. And then there was the Microsoft Partner Center experience...
What Tauri Gives You
Out of the box, Tauri can produce:
- MSI installers — Traditional Windows installer
- NSIS installers — Another Windows installer format
- Portable executables — Single .exe file
For personal use or distribution via GitHub Releases, the portable executable is perfect. It's a single 4MB file that runs anywhere.
But the Microsoft Store requires MSIX packages. Tauri's GitHub issues have requests for MSIX support going back years, but it's not implemented.
The MSIX Format
MSIX is Microsoft's modern packaging format. It's essentially a ZIP file with:
AppxManifest.xml— Package metadata, capabilities, visual assets- Your application files
- Various icon sizes for the Store and Windows UI
The key difference from MSI: MSIX apps run in a sandboxed environment with declared capabilities. Want to access the network? Declare it. Want to run external programs? You need runFullTrust.

Building the MSIX
I ended up creating a PowerShell script that:
- Takes the Tauri build output
- Generates the manifest
- Creates icons in every required size
- Packages it all with Windows SDK tools
The Manifest
The manifest is XML, and it's picky. Here's the essential structure:
<?xml version="1.0" encoding="utf-8"?>
<Package xmlns="http://schemas.microsoft.com/appx/manifest/foundation/windows10"
         xmlns:uap="http://schemas.microsoft.com/appx/manifest/uap/windows10"
         xmlns:rescap="http://schemas.microsoft.com/appx/manifest/foundation/windows10/restrictedcapabilities">

  <Identity Name="OctasoftLtd.wslui"
            Publisher="CN=8AC4B328-845D-4C1C-B1FC-CE52C08F4693"
            Version="0.14.0.0"
            ProcessorArchitecture="x64" />

  <Properties>
    <DisplayName>WSL UI</DisplayName>
    <PublisherDisplayName>Octasoft Ltd</PublisherDisplayName>
    <Logo>Assets\StoreLogo.png</Logo>
  </Properties>

  <Dependencies>
    <TargetDeviceFamily Name="Windows.Desktop"
                        MinVersion="10.0.17763.0"
                        MaxVersionTested="10.0.22621.0" />
  </Dependencies>

  <Resources>
    <Resource Language="en-us" />
  </Resources>

  <Applications>
    <Application Id="wslui"
                 Executable="wsl-ui.exe"
                 EntryPoint="Windows.FullTrustApplication">
      <uap:VisualElements
        DisplayName="WSL UI"
        Description="Manage WSL2 distributions"
        BackgroundColor="transparent"
        Square150x150Logo="Assets\Square150x150Logo.png"
        Square44x44Logo="Assets\Square44x44Logo.png">
        <uap:DefaultTile Wide310x150Logo="Assets\Wide310x150Logo.png"
                         Square310x310Logo="Assets\Square310x310Logo.png"
                         Square71x71Logo="Assets\Square71x71Logo.png" />
      </uap:VisualElements>
    </Application>
  </Applications>

  <Capabilities>
    <rescap:Capability Name="runFullTrust" />
  </Capabilities>
</Package>
Key points:
- Identity.Publisher must match exactly what you registered in Partner Center
- Version must be four parts (semver doesn't work)
- runFullTrust is required because we call
wsl.exeand access the registry - MinVersion 10.0.17763.0 is Windows 10 1809 (first version with stable WSL2)
The Icons
Microsoft requires specific icon sizes. Not "at least 150x150" but exactly these pixels:
| Asset | Size | Purpose |
|---|---|---|
| StoreLogo.png | 50x50 | Store listing thumbnail |
| Square44x44Logo.png | 44x44 | Taskbar, Start Menu |
| Square71x71Logo.png | 71x71 | Start Menu medium tile |
| Square150x150Logo.png | 150x150 | Start Menu large tile |
| Square310x310Logo.png | 310x310 | Start Menu extra large |
| Wide310x150Logo.png | 310x150 | Start Menu wide tile |
I wrote a PowerShell script using System.Drawing to resize the source icon:
function Resize-Icon {
    param($Source, $Destination, $Width, $Height)

    Add-Type -AssemblyName System.Drawing

    $original = [System.Drawing.Image]::FromFile($Source)
    $resized = New-Object System.Drawing.Bitmap($Width, $Height)

    $graphics = [System.Drawing.Graphics]::FromImage($resized)
    $graphics.InterpolationMode = [System.Drawing.Drawing2D.InterpolationMode]::HighQualityBicubic
    $graphics.DrawImage($original, 0, 0, $Width, $Height)

    $resized.Save($Destination, [System.Drawing.Imaging.ImageFormat]::Png)

    $graphics.Dispose()
    $resized.Dispose()
    $original.Dispose()
}

# Generate all required sizes
Resize-Icon -Source "icon.png" -Destination "Assets/StoreLogo.png" -Width 50 -Height 50
Resize-Icon -Source "icon.png" -Destination "Assets/Square44x44Logo.png" -Width 44 -Height 44
# ... and so on
Creating the Package
With manifest and assets ready, the Windows SDK does the actual packaging:
# Find makeappx.exe in Windows SDK
$sdkPath = "C:\Program Files (x86)\Windows Kits\10\bin\10.0.22621.0\x64"

# Create the MSIX (unsigned)
& "$sdkPath\makeappx.exe" pack `
    /d ".\package-contents" `
    /p ".\dist\OctasoftLtd.wslui_0.14.0.0_x64.msix" `
    /nv

# For local testing, sign with self-signed certificate
& "$sdkPath\signtool.exe" sign `
    /fd SHA256 `
    /a `
    /f ".\certificate.pfx" `
    /p "password" `
".\dist\OctasoftLtd.wslui_0.14.0.0_x64.msix"Important: For Store submission, upload the unsigned MSIX. Microsoft signs it with their certificate automatically.
The GitHub Actions Pipeline
The release workflow creates both the portable executable and the Store MSIX:
name: Release

on:
  workflow_dispatch:
    inputs:
      tag:
        description: 'Release tag (e.g., v0.14.0)'
        required: true

jobs:
  build:
    runs-on: windows-latest

    steps:
      - uses: actions/checkout@v4
        with:
          ref: ${{ inputs.tag }}

      - uses: actions/setup-node@v4
        with:
          node-version: '20'
          cache: 'npm'

      - name: Install Rust
        uses: dtolnay/rust-action@stable

      - name: Install dependencies
        run: npm ci

      - name: Build Tauri app
        run: npm run tauri build
        env:
          VITE_APTABASE_KEY: ${{ secrets.APTABASE_KEY }}

      - name: Generate Store icons
        run: .\scripts\generate-store-icons.ps1

      - name: Convert version for MSIX
        id: version
        run: |
          $tag = "${{ inputs.tag }}"
          $version = $tag -replace '^v', ''
          $msixVersion = "$version.0"  # Add fourth part
          echo "msix_version=$msixVersion" >> $env:GITHUB_OUTPUT

      - name: Build MSIX package
        run: |
          .\scripts\build-msix.ps1 `
            -Version "${{ steps.version.outputs.msix_version }}"

      - name: Create portable exe
        run: |
          Copy-Item "src-tauri/target/release/wsl-ui.exe" `
            "dist/WSL.UI_${{ inputs.tag }}_x64_portable.exe"

      - name: Upload to Release
        uses: softprops/action-gh-release@v1
        with:
          tag_name: ${{ inputs.tag }}
          files: |
            dist/OctasoftLtd.wslui_*.msix
            dist/WSL.UI_*_portable.exe
The Partner Center Maze
Here's where the fun begins. To publish on the Microsoft Store, you need a Microsoft Partner Center account.
Becoming a Partner
The registration process is... an experience:
- Microsoft Account — Need a Microsoft account (obvious)
- Developer Registration — Pay the one-time $19 fee
- Verification — Provide ID, address, sometimes business documents
- Wait — Verification can take days
So far, reasonable.
Finding the Right Portal
This is where I burned the best part of 4 hours. Microsoft has approximately seventeen different portals:
- Partner Center (partner.microsoft.com) — For Store apps
- Azure Portal (portal.azure.com) — For Azure services
- Microsoft 365 Admin — For business accounts
- Visual Studio Subscriptions — For VS benefits
- And more...
The Store publishing flow has changed multiple times. Google results often point to deprecated workflows. Links in Microsoft documentation lead to 404s or redirect to unrelated pages.

The Wrong Path (Learn From My Mistakes)
I started at storedeveloper.microsoft.com — which seems like the right place, right?
The page prompts you to sign in. Here's where I made my first mistake: I created a "work account" — one of those something@yourcompany.onmicrosoft.com accounts that Microsoft offers when you don't have your own domain configured with Azure AD.
After signing in, I selected Company as the account type:

Then chose the Windows program for releasing apps to the Microsoft Store:

And then... nothing. I filled in all the company information, clicked submit, and was greeted with:
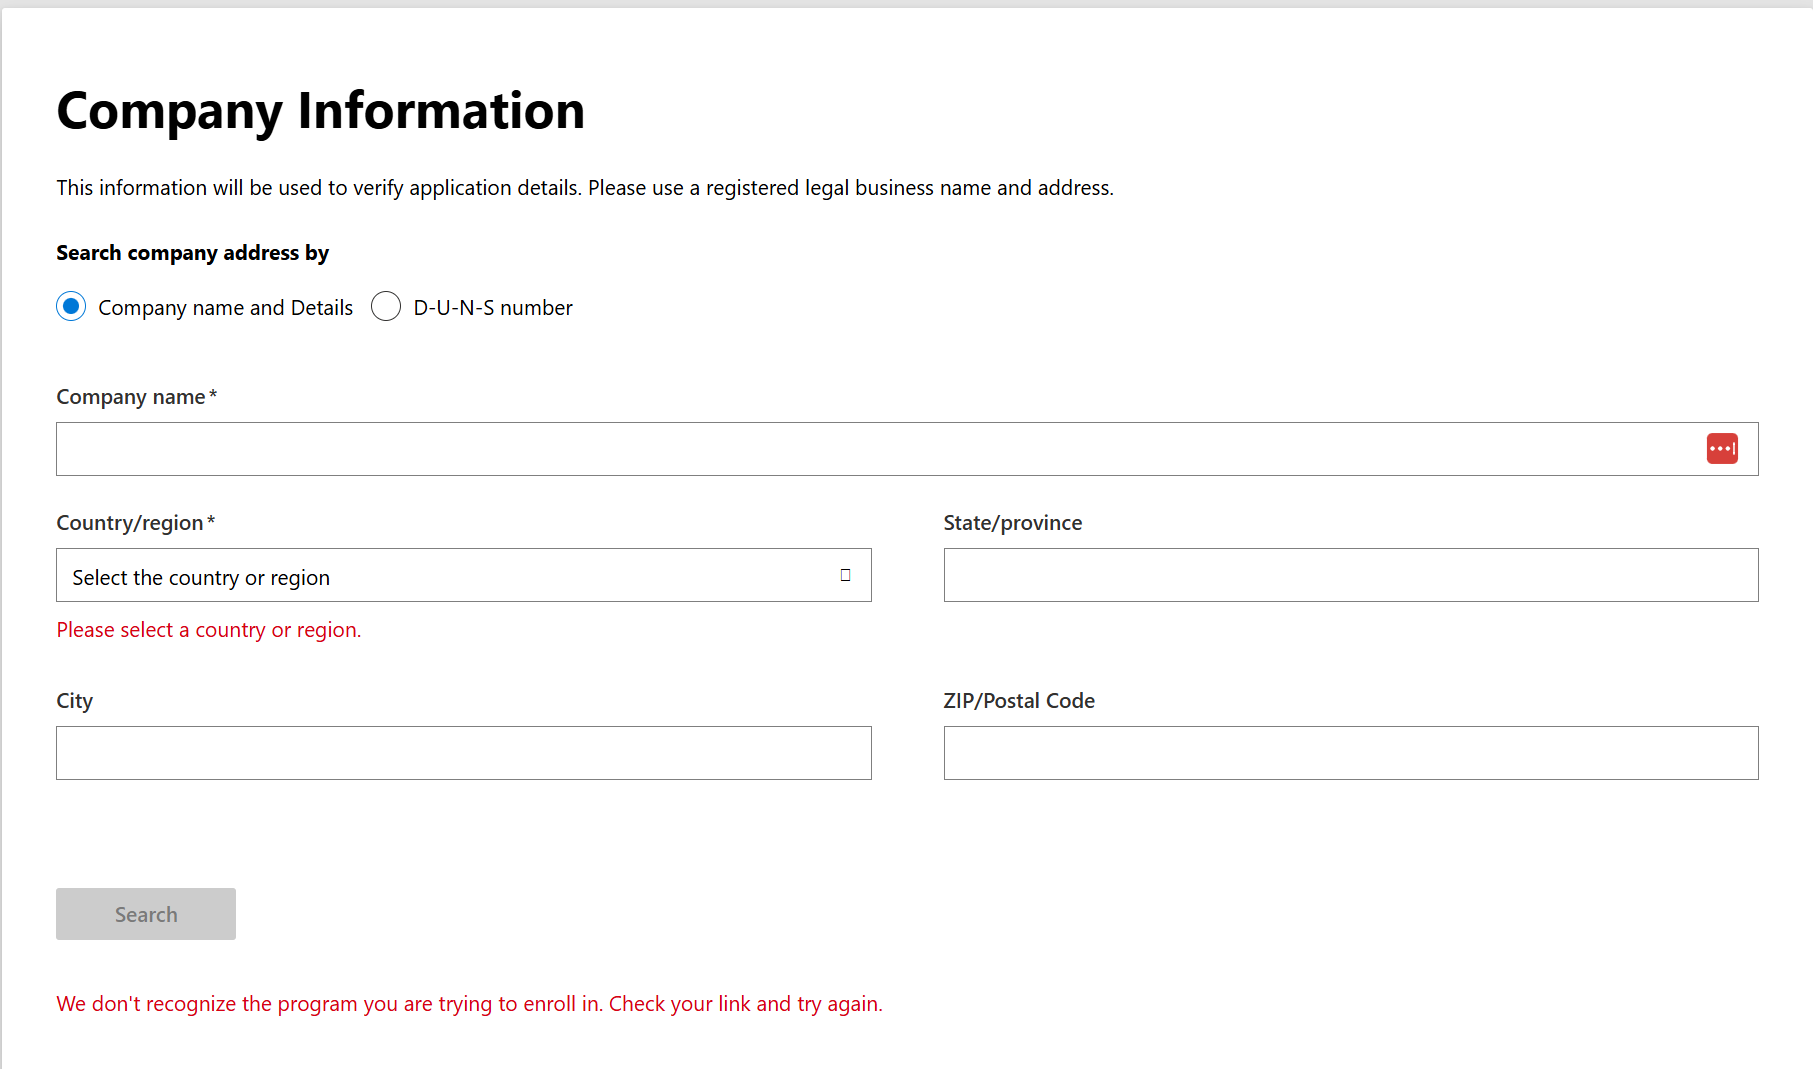
"We don't recognize the program you are trying to enroll in. Check your link and try again."
I tried everything. Different browsers, clearing cache, re-reading the documentation. Nothing worked. The form simply refused to accept my registration.
The Fix
After hours of frustration, I finally figured it out: the @onmicrosoft.com account was the problem.
When I signed out and logged back in with my actual business email (me@mydomain.co.uk — a real domain, not Microsoft's default), suddenly everything worked. Same form, same options — Company registration, Windows program — but this time it accepted my enrollment and took me through the correct journey.
The confusing part is that Microsoft actively offers you the option to create a "work account" during sign-up, but that account type apparently can't enroll in the Windows developer program. There's no error message telling you this — you just hit a brick wall.
TL;DR: If you're registering as a company for the Microsoft Store, use your real business email domain, not an @onmicrosoft.com account.
The Correct Path
Once past the enrollment nightmare, here's the actual path (as of early 2026):
- Go to partner.microsoft.com
- Sign in with your real business email (not @onmicrosoft.com)
- Navigate to Windows & Xbox (not the main dashboard)
- Click Overview then Create new product
- Choose MSIX or PWA app
- Reserve your app name
Package Identity
Once you create your app in Partner Center, you get assigned:
- Package Name:
OctasoftLtd.wslui - Publisher:
CN=8AC4B328-845D-4C1C-B1FC-CE52C08F4693 - Publisher Display Name:
Octasoft Ltd
These must match exactly in your manifest. If they don't, the upload fails with cryptic errors.
Submission Requirements
The Store requires more than just the MSIX:
- Screenshots — At least one, recommended 4-6
- Description — Up to 10,000 characters
- Privacy Policy URL — Required even for apps that don't collect data
- Support Contact — Email or website
- Age Rating — Go through the questionnaire
- Store Listing — Icon, feature list, tags
The screenshot requirements caught me off guard:
- Minimum 1366x768 or 768x1366
- Maximum 3840x2160
- PNG or JPG
- At least one, maximum ten per supported language
I used the E2E test screenshot feature (covered in the next post) to generate these automatically.
Certification Process
After uploading, the app goes through certification:
- Automated Tests — Checks for malware, crashes on startup, etc.
- Manual Review — Human checks for policy compliance
- Signing — Microsoft signs the package
- Publishing — App appears in Store
For WSL-UI, this took about 48 hours for the first submission. Subsequent updates are faster (often under 24 hours).
Lessons Learned
- MSIX isn't that hard — Once you understand the manifest and icon requirements, it's just file packaging
- Automate everything — The PowerShell scripts save time and reduce errors
- Document the process — I created
MSIX-PACKAGING.mdin the repo for future reference - Partner Center is confusing — Bookmark the correct pages, ignore outdated documentation
- Unsigned for Store — Don't sign packages for Store submission; do sign for local testing
The Store presence is worth it. Automatic updates, trusted distribution, and visibility to users who wouldn't find GitHub Releases.
Next up: how I built automated screenshot generation and video recording for both documentation and Store listings.
Try It Yourself
WSL-UI is open source and available on:
- Microsoft Store: Search for "WSL UI" or visit the store listing
- Direct Download: Official Website
- GitHub: github.com/octasoft-ltd/wsl-ui